Integration of the campus copiers as printers under Linux / Unix
This information applies to the new campus copiers whose rollout will take place starting in December 2021.
The information on the previous copiers can be found in the information on the previous campus copiers
The Ricoh multifunction printers are managed
by the Facilities Management.
You will also find information, notes and instructions (in german) on how to use the printers and the billing codes there.
The following instructions are only intended for employees who want to use the copiers on campus as printers under Linux / Unix. Other devices are available for students, where both integration and payment system differ.
Basic information about the setup
The following description assumes a CUPS-based printing system.
Basically, you need a so-called 'PostScript Printer Desription' file, PPD for short, to set up a printer. In addition, you have to specify the address at which the printer to be set up can be reached with which protocol.
The various Linux distributions usually offer their own graphical interfaces for configuring printers. In addition, a web interface of the Cups system is usually also available locally under port 631. These interfaces sometimes differ significantly from each other, although they are ultimately only frontends for the CUPS printing system working underneath. Therefore, the following explains how to set up the printers from the command line. This procedure is very simple and works distribution-independently. All you have to do is download a centrally provided PPD file and then use the PPD file to set up the printer queue with a command.
Set up campus copiers as PostScript printers:
All devices on campus have a PostScript module enabled.
First download the PPD file:
Ricoh-IM_C4500-Postscript-cau.ppd
In this printer description file the options and finishers of the devices installed at CAU are preconfigured. The original Ricoh printer description file without this pre-configuration can be found here.
Setup of the queue via lpadmin:
As root:
# lpadmin -p campusprint_ps \
   -v lpd://campusprint.uni-kiel.de/campusprint_color_ps \
   -E -P Ricoh-IM_C4500-Postscript-cau.ppd
Under Ubuntu as an administratively authorized user:
$ sudo lpadmin -p campusprint_ps \
    -v lpd://campusprint.uni-kiel.de/campusprint_color_ps \
    -E -P Ricoh-IM_C4500-Postscript-cau.ppd
[sudo] password for ..... :
Use and assignment of print jobs to your identifier
In the printing system used, RZ identifiers are enabled by the authorized persons for the billing codes. These are the normal identifiers in the computing centre of the form 'suabc123'. So, in order to be able to print, your RZ identifier must first be unlocked by the person who manages your local billing code, you must know this identifier and also the associated password (in Active Directory).
So that your print jobs submitted under Linux / Unix are also assigned to your identifier and you can also pick them up at the devices, there are several possibilities:
- You use locally as identifier the same identifier as you use in the computing centre for printing ('suabc123'). Then you can print directly from applications and from the command line and the print job is assigned to your identifier.
- If you use a different identifier locally, you can specify the -U option when printing from the command line, like this
lpr -P campusprint_ps -U suabc123 dankesrede_nobelpreis.ps
-
If you are the only person using a PC or notebook and use a different identifier on it than in the computing centre, you can also specify the identifier to be used for printing when setting up the queue. In the following example, a queue named campusprint_suabc123_ps is set up in which all printouts are made using the suabc123 identifier. For this purpose, the identifier must be specified in the URL of the queue:
# lpadmin -p campusprint_suabc123_ps \
   -v lpd://suabc123@campusprint.uni-kiel.de/campusprint_color_ps \
   -E -P Ricoh-IM_C4500-Postscript-cau.ppd
Specifying print options
Print options such as color / b/w or single-sided / double-sided must be specified when the print job is submitted. The graphical interfaces differ depending on the distribution, desktop interface and program used, but basically offer the same options.
In the graphical user interfaces it is usually not possible to specify a user name in options.
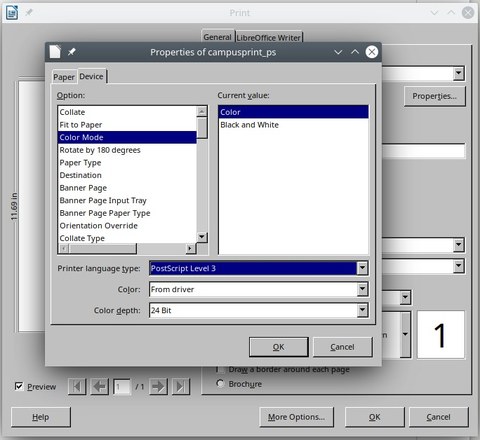
Color or black and white
- Selection via graphical interface of the driver (example LibreOffice under Ubuntu)

- Command line options:
- Black and white: -o ColorModel=Gray
- Color: -o ColorModel=CMYK
Single or double-sided printing

- Command line options:
- one-sided: -o Duplex=None
- double-sided: -o Duplex=DuplexNoTumble
Control and test via user dashboard
After setting up the printer queues, it is possible to check directly on the Computer whether it is possible to print to the system. To do this, simply place any print job in the new queue. Afterwards, it can be checked in the so-called user dashboard whether the print job is available in the system. Details are documented in the
User dashboard documentation (in german)
Note on the use of the different queues per lpr
A queue controlled via lpr prints everything exactly as it was created at the sending client. The job is not changed. If you send a color print, color is also printed, even if it goes into a queue that has '_sw' in its name.
The reason for this is that print preparation is completed on the client and the print server only serves as a spooler for a finished job. The settings must always be made or preset on the client.
An exception is Windows printing via the share: The print formatting is based on the provided driver of the server, thus the default settings of the printer on the Windows server are taken over to the client.
Therefore, also check on the device before releasing print jobs for printing whether the document will be printed in the way you want. When a job is marked, these details are shown in the display.

