Instruction for Windows Fortigate client
Download
First, please download the appropriate FortiClient VPN client for your system from our pages (account password is required if the access is not from within the university network) or directly from the manufacturer Fortinet.
- FortiClient for Windows (32 Bits Systems)
- FortiClient for Windows (64 Bits Systems)
- FortiClient - Download from Fortinet.
All Microsoft operating systems after Windows 8.1 are supported.
The VPN-only variant of FortiClient is offered and not the full-fledged variant.
The full version includes additional components such as virus scanners. These are not licensed by the computing centre and are not supported. If you are interested in using an antivirus program, Sophos Antivirus is available on campus.
Installation
After downloading the installer, please start it with a double click and the regarding security request has to be answered with yes.

The FortiGate installer will now reload the relevant data from the internet (internet connection required!).


Subsequently the setup wizard will start automatically.

After this, the license agreement has to be read and accepted (check the box on the bottom on the left-hand side).

Forticlient is only intented for using the VPN only. Futher components, e.g.
Now, please choose to install VPN components: the "VPN Only" option is sufficient for only using VPN. Please avoid using "Complete" as problems might occur, if a second antivurs componente (included as "Demo mode") is installed beside e.g. Sophos Antivirus. In case you are interested in using an antivirus program, Sophos Antivirus is provided.
Now the installation directory can be chosen. We recommend to keep the already pre-filled path, unless desired differently.

Please click "Install" to start the installation.


Please finish the installation by clicking "Finish".

Configuration
After FortiClient has been installed successfully, the client can be found in the program folder or can be searched in the start menu.
The "FortiClientConsole" can be started by clicking on FortiClient. For setting up a VPN connection please click "Configure VPN".

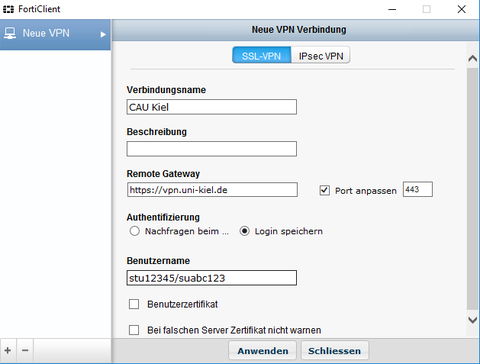
Please click on the "+" symbol (on the bottom of the left-hand side) for establishing a new VPN connection:

Please choose "SSL-VPN".
For the Verbindungsnamen "CAU Kiel" can be selected. However, using other names is also possible.
Please note, that for establishing a VPN connection to CAU the "Remote Gateway" has to be "https://vpn.rz.uni-kiel.de".
In general the port does not have to be modified. However, if port 443 is not available, the port can be adjusted after selecting "Port anpassen".
There is the possibility to save the authentication data. If not, the password has to be entered at each login.
Please enter your "su"- or "stu"- number (employees or students) angegeben werden.
The VPN profil will be saved after clicking on "Anwenden".

Connect
Now the log in in the main window via the VPN-Profil der CAU Kiel is possible. Please click on "Verbinden" to start the connection process.
If the connection has been established, a pop up with the message "FortiClient - Verbunden zu CAU Kiel" appears.
The "FortiClient Console" provides information regarding the VPN connection e.g. (assigned IP address, duration of the connection and the amount of the received and the sent data).
